I can't lie, I was a little skeptical of how these would work (I am a total manicure snob), but after hearing about them EVERY SINGLE DAY for a month from Christine, I decided to give them a whirl. I was truly blown away with how easy and inexpensive they were. The entire set cost me about $9.00 which includes 16 nail strips, a cuticle pusher, and nail file. The nail strips are pretty long so if you have shorter nails like I do, you can use one strip for 2 nails. They come in 2 sealed packages (8 nail strips in each) I recommend trying to find ones that fit from only one package because if you open both packages, I have learned (the hard way) that you can't save the ones that you don't use because they will dry out. I even had mine stored in a ziplock bag and they still dried out and wouldn't stick to my nail when I tried to do a repair a few days later.
The concept is so simple that it almost seems to good to be true. You simply find a nail strip that fits your natural nail, peel off the plastic back, match it up to your nail, stick it on, cut off the access strip with your cuticle clippers, (If you have short nails and can use one strip for 2 nails, this is where you would take the other side of the strip and apply it to the other nail before it dries out) then simply take the nail file and file your nail. This will shape your nail, take off the extra nail strip off of the tip of your nail, and smooth the edges. I have found it is good to do a coat of colored nail polish that is similar to the nail strip underneath. This way if the nail strip chips, you will have a coat of nail polish underneath that makes the chip in the nail strip less noticeable. It really is that simple and idiot proof. Trust me, if I can do it, you can too.
These strips last longer than any nail polish I have tried (usually around 5 to 7 days before chipping and I use my hands a lot.) They are perfect for day to day use or a quick fix when you have chipped nails between manicures. Also, here is no dry time so they are great for little girls who want fun nails too! I can't wait to pop out a baby girl and slap these on her fingers in the delivery room (along with her first MAC lipglass and a bad ass pair of falsies, obviously)
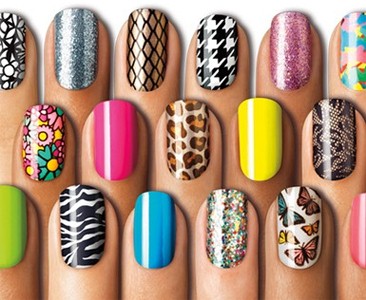
The strips come in so many different colors that there is something for everyone. There are prints, glitter, and solid colors as well. I recommend trying one of the glitter prints first because they are fool proof. Once you get the hang of it you can graduate to the prints such as Cheetah, Houndstooth, and lace. You can find them at grocery stores, drug stores, basically anywhere. So next time you're out, pick up a set. I promise you'll love them!
xoxox,
Ally Stagg
No comments:
Post a Comment